Home, Design, Recipes

Sunday, June 24, 2012

Cuppies for an engagement party

When a dear friend asked if I would bake cupcakes for her sister's engagement party, I happily agreed. I am so honored that she thought of me and wanted me to make something for such a special occasion. Now, I just hope I didn't screw it up!

Prior to the event, we decided on a chocolate cupcake with two different types of frosting- whipped chocolate ganache and a vanilla swiss meringue buttercream. Although we're having the same cake, the different colors and textures of frosting will add some variety to the display. I wanted to do something girly and chic for the engagement cupcakes, so I made some colored buttons and flowers from rolled fondant.

I started with some of Wilton's ready-to-use white colored rolled fondant. Although Wilton offers a variety of colored fondants, I chose the white one so I could tint it to the color of my choice - yellow and orange.

Rolling pin, fondant, toothpick and cookie cutters.
Using a small round cookie cutter, I cut the rolled fondant into 1/2 inch rounds. Then, I pierced four holes onto the middle part of the circle, resembling holes in a button. 


Pierce four holes onto the middle part of the circle with a toothpick to resemble a button.

In addition to the button, I also made a daisy. I cut the fondant with a flower shaped cookie cutter and placed the cut fondant over something with a conclave or hollow bottom. That way, the fondant kinda sinks in and resembles the shape of a flower bud. Then, I dab the middle of the flower with some water and added a pearl dust dragee. Allow the cut fondant to dry overnight before using. 

After you've frosted the cupcakes, simply add the fondant shapes on top. I made orange buttons for the chocolate ganache frosted cupcakes and yellow daisies for the swiss meringue buttercream frosted ones to give them some contrasting colors. I'll do a post on whipped chocolate ganache and swiss meringue buttercream another day, but here are the cuppies!


Congratulations Tim and Michelle! Best wishes to you both! Wishing you a lifetime of joy and happiness! 

Tuesday, May 8, 2012

Okonomiyaki

Okonomiyaki is a savory Japanese pancake made with a variety of ingredients. There are a few key ingredients that must be used in the recipe, but you can pretty much add anything you like (i.e. different types of meat) to it. Hence, the word okonomi, meaning what you like. It is really easy and inexpensive to make, and great for parties. In the past, I've read about people making pizza for parties but if you're tired of that idea, this would be a great alternative. Like pizza, everyone can make their own okonomiyaki with their choice of fixings. Serve this alongside some ice cold Sapporo and you're all set! Itadakimasu!

I learned this recipe from my mother-in-law and I've made it again at home to test it out. It turned out great and I hope you will give this a shot! :)

Okonomiyaki Ingredients:
Yields approximately 4 servings
1/2 cup grated nagaimo (yam- click link for a picture)
5 eggs
1/2 cup dashi/water
1 cup okonomiyaki flour
3 cups shredded cabbage
1/2 cup chopped green onion
1/4 cup pickled ginger
1 cup chopped shrimp/squid
Vegetable oil
Thinly sliced pork
Japanese style mayonaise (click link for picture)
Okonomi sauce (click link for picture)
Dried seaweed powder (click link for picture)
Dried bonito flakes (click link for picture)


Side note: All of the ingredients stated above can be purchased at a Japanese grocery store.


Instructions:
1. Peel skin off the nagaimo and grate. When grated, the nagaimo will turn into a thick pastey texture that resembles glue.


2. Whisk the grated nagaimo, 1 egg, dashi/water and okonomiyaki flour together. If the batter is too thick, add more liquid (dashi/water). And if the batter is too thin, simply add more okonomiyaki flour.

Okonomiyaki flour
The consistency of the batter should be thick and fall back into the bowl like lava. 
3. Add shredded cabbage, green onion and ginger. If using shrimp, peel and devein the shrimp. Chop both shrimp and squid, if using either or both into bite size pieces and add to the batter. Mix well.


I used an electric griddle to make the okonomiyaki. You can also cook the pancake using a non-stick pan over medium-high heat. I got my griddle from Zojirushi.

4. Damp a paper towel with vegetable oil and lightly coat the pan. I set the pan at medium-high heat.


5. Scoop about 1 cup of okonomiyaki batter onto the pan. Then, lay thinly sliced pork on top of pancake. Let the pancake cook for about 4-5 minutes.


6. Flip the pancake over and let the other side cook for about 1 minute. After you flipped over the pancake, crack open an egg for each okonomiyaki that you have made.


7. Break the yolk slightly with the spatula and place the pancake, with the pork side down, on top of the egg.


8. Allow the pancake to cook fully, another 5-7 minutes.

9. Top the cooked okonomiyaki with mayonnaise, okonomi sauce, dried seaweed powder and fine bonito flakes.


Enjoy!

Monday, April 23, 2012

A Princess Tea Party


Over the weekend, we threw an intimate tea party for a very special 3 year old. Because she absolutely loves Cinderella, it is only fitting that we do a blue and white theme party with "Princess" accents.

We decided to focus more on the colors, rather than going all out with Cinderella party products. Everything was purchased from Party City.

We had (from top left) smoked salmon sandwiches (recipe below), ham and cheese sandwiches, chicken salad sandwiches, shortbread cookies and earl grey macarons with tea. 

I guess some other princesses decided to join the party too.

I've made these smoked salmon sandwiches many times and it has always been a big hit with both the adults and kids. So, I decided to make them again for this tea party.

Recipe for smoked salmon sandwich:
1 stick butter, softened
2 sprigs green onion, chopped
1/4 cup chopped parsley
Salt and pepper
1 loaf honey whole wheat bread
Smoked salmon (about 2 4oz packages)
2 cups thinly sliced cucumber

Instructions:
1) To make the compound butter, leave the stick of butter to soften at room temperature. This usually takes a few hours after you take them out of the refrigerator. However, if you're like me and forgot to prepare ahead of time, simply put the stick of butter in the microwave and heat it at 5 seconds intervals until it softens.
2) Add chopped green onion, parsley, salt and pepper to the softened butter. You can use the mixer with a paddle attachment to mix or the back of a wooden spoon to gently combine the mixture. Because the smoked salmon has already been seasoned, use salt sparingly. You do not want an overly salty sandwich.
3) Spread the compound butter on both sides of the bread. Add smoked salmon and cucumber.
4) Trim the sides off and cut the sandwiches diagonally into four mini triangles.

Side note:
Compound butter is simply butter with supplementary ingredients - generally herbs or spices. You can also use this compound butter to flavor a simple pan seared fish (I love it with Salmon) or scallops.


I used this shortbread recipe for the princess dress and slipper cookies. I got the cookie cutters at Sur La Table for a dollar each. The dress and slipper cookies are adorned with dragees in different sizes and color, and decorated in white and blue royal icing.

Earl Grey Macaron.
I made a batch of earl grey macarons that I've brushed with light blue food coloring to match the theme of the party. To add color to your macarons, simply mix a few drops of food coloring with water. Then, lightly brush the top of the macarons and let them dry.

Happy birthday sweet Shi-wa-wa! :) And special thanks to Jessica for hosting and the rest of the aunties who helped out too!

Tuesday, April 10, 2012

A Lemon Inspired meal

I guess nothing screams spring like lemons. This wonderful fruit is vibrant, acidic and versatile. You can use lemons for savory dishes or desserts, hot or cold, heck it's even used as a cleansing tonic. To welcome spring, I decided to create a meal using this flavorful fruit. On the menu is a shrimp, peas and corn orzo, oven-roasted dover sole and lemon cupcakes.


The oven roasted fish was inspired by a dish Ina Garten had made. In her recipe, Ina used swordfish and a sauce that is similar in taste to tartar sauce. I am not a giant fan of swordfish because the meat is a little tough. I wanted something flakey and soft, and that I can prepare and cook quickly. So, I decided on sole. Also, I love the combination of herbs with seafood. Rather than using tartar sauce, I decided to make a herb sauce that would brighten up this dish and give it a fresh flavor.

Ingredients:
10 pieces of sole (you can use any fish of your choice though another good one is cod)
A bunch of Basil leaves plus 1/4 cup chopped basil (enough for fish and sauce)
1/2 cup mayonnaise
3 garlic cloves
2 tablespoons chopped onion
2 tablespoons cilantro
1 sprig green onion
2 lemons
Salt and pepper

1. Preheat oven to 400 degrees F. 
2. Place a piece of basil inside each fillet and roll the fish to seal it. Place the fish on an oven proof baking dish. 


3. Combine the 1/4 cup chopped basil leaves, mayonnaise, garlic, onion, cilantro, green onion and juice of 2 lemons in a food processor. Season with salt and pepper, then pulse to combine. 
4. Spread 3/4 of the sauce over the fish. Reserve the rest to pour over the finished dish. If prepping this dish in advance, keep the fish and sauce separated in the refrigerator until you are ready to use. Spread the sauce right before you place them in the preheated oven.


5. Bake the fish at 400 degrees F for 18 minutes. Then, switch to broil and cook for another 2 minutes. The cooked fish should be firm to the touch and slightly browned on top. Depending on the thickness and choice of fish, adjust the cooking time accordingly. 

Oven roasted dover sole with herb dressing.
Over the weekend, we had dinner at Osteria La Buca in Los Angeles. It came highly recommended by a friend and the family decided to check it out. It was a very satisfying and enjoyable meal. There was one dish that I particularly enjoyed that night- agnolotti with tiger shrimp and peas. Inspired, I came up with my version of pasta with tiger shrimp and peas. 

Shrimp, peas and corn orzo.


Ingredients:
1 cup peas (I used frozen peas and corn)
1 cup corn
16 oz orzo
1 lb peeled and deveined shrimp
Paprika powder
Salt and pepper
Olive Oil
4 lemons
2 tablespoons chopped mint
2 tablespoons chopped parsley


1. In a pot of boiling water seasoned with salt, blanch the peas and corn for 30 seconds. Remove from pot and set aside. 
2. Prepare orzo according to the instructions on the packaging. I cooked the orzo in the same pot that I had previously used to blanch the vegetables. That way, you don't have to wash another pot. 
3. Season the shrimp with paprika, salt and pepper, one tablespoon of olive oil and the juice of one lemon. 
4. Set the oven to "broil" and place the shrimp on the top rack of the oven. The shrimp will cook quickly, about 8-10 minutes. Since all ovens are different, check the shrimp from time to time. When it turns pink and is firm to the touch, it is cooked and can be removed from the oven.


 5. While the orzo and shrimp are cooking, prepare the lemon vinaigrette. Whisk equal amounts of lemon juice and olive oil together. I used the juice of three lemons. Season with salt and pepper to taste. 


6. When the orzo is done, drain the liquid and combine the orzo, peas and corn in a nice serving bowl. Toss together with the shrimp, chopped mint and parsley, and vinaigrette. The warm orzo will soak up the lemon vinaigrette. I also added some liquid from the cooked shrimp into the orzo to add more flavor. If your orzo seems dry, simply prepare more lemon vinaigrette. 

Although you can make the fish and orzo on separate occasions, the combination of these two dishes work very well together. I think each dish helps enhance the flavor of the other and it brings on a very light and refreshing taste. 

For dessert, I made lemon cupcakes with cream cheese frosting. I used a regular vanilla cupcakes recipe but added some lemon juice for flavor. In conjunction with Easter, I decorated the cupcakes with Easter chocolate eggs and edible green grass. Voila. 

Lemon Cupcake.

Thursday, April 5, 2012

Channeling our inner Julia Child

My friend Kari gave me a copy of Julia Child's "Mastering the Art of French Cooking" last week and we thought we would finally put her recipes to test. I'm sure the recipes are fine, but I have never cooked anything from Julia Child before and the mere thought of it had always left me feeling nervous and intimidated. When Shunsuke saw my copy of the cookbook on the countertop, he loudly asked if I can do this. It is about a thousand pages of instructions with very little pictures. I initially thought it would be so difficult because I don't have a visual of how the dish should end up looking like. But, since I have an extra pair of hands and another brain to toss ideas around, Kari and I faced our fears and attempted to make a meal from Julia Child's cookbook.


Kari was nice to host the dinner at her place. The pictures were taken in her lovely kitchen. On the menu that evening was: fish poached in white wine, sauté vegetables, potato gratin and grand marnier soufflé. We also made a salad to start though it wasn't from Julia's book.


To start, Kari made a beet and pear salad. She roasted the beets in the oven for about an hour and shredded them along with pears. A light vinaigrette to toss the simple salad and topped with slivered almonds and some blue cheese. Big Yum!


Kari cutting the potatoes using a mandolin for our potato gratin.


Finished gratin. Julia Child uses eggs in her gratin which I thought was quite different. It gave the dish a very nice and soft spongy texture. Definitely different from the typical ones with béchamel sauce which tends to be heavier. 


White wine poached fish. It was very simple to make. All you need was fish (we used cod) white wine, water, butter (of course) and shallots. I understand that this may be the traditional French way of poaching fish, but I thought it didn't do much for the fish. The fish had very little flavor and tasted bland. I will make this recipe again with a few alterations, using some herbs and stock to flavor the fish. 


Saute Vegetables- Julienned carrots, fennel, zucchini and yellow squash. The fennel adds a light licorice flavor to the vegetables.


Finished dish. We plated it the best we could. 


Although the fish was a disappointment, the Grand Marnier soufflé was definitely the highlight of the meal. It was light, fluffy and delicious. I have to say that this recipe was much easier than the other soufflé recipes I've tried. It was so good. I'm still dreaming about it.


When I first started cooking this meal with Kari, I thought I would never use Julia Child's cookbook again. The book didn't have pictures of the dishes we are making and the style of which the recipes were written was very different, making it a little harder to follow. But, having made that soufflé and seeing how well it turned out, I changed my tune. It is not as difficult as I thought and I would try more recipes in the future. You just have to get used to her style of writing. Yes, and  I also have to make sure I stock my fridge with butter. Tons of butter because it ain't a Julia Child's recipe if you don't have at least half a stick of butter in there!

Thank you Kari for the book and for hosting the dinner party. It was very fun! Bon Appetit!

Tuesday, March 27, 2012

Shortbread cookies

I love the taste and texture of shortbread cookies. They are crisp on the outside but buttery and crumbly on the inside. Shortbread is a classic Scottish dessert that consists mainly of the following three ingredients: sugar, butter and flour. While I was researching other shortbread recipes, I noticed that some called for rice or cornflour and shortening. This gives a different texture to the cookie - crispier or softer depending on the type of flour and amounts used. But if you know me, I like to keep things simple and classic, which is why my shortbread recipe is made with those top three ingredients and vanilla, of course.

The shortbread recipe is adapted from Claire Clark, the former pastry chef at Thomas Keller's famous French Laundry. When we visited The French Laundry a couple years ago, we got a bag of shortbread cookies as favors after the meal. Those were the best shortbread cookies I have ever had and when I found her pastry cookbook, I was ecstatic. Obviously, the shortbread cookies were the first thing I made from that book. Claire's recipe was actually from her mother. I personally love recipes that are passed down from generation to generation. It brings a sense of nostalgia and tradition to the people making and those enjoying them. In her book and at the French Laundry, she cut her shortbread into oblong shapes, which looks more traditional. Because I wanted to make shaped cookies from the shortbread, I altered some steps in her recipe.


1. Preheat oven to 350 degrees F or 180 degrees C.
2. Cream the butter, sugar and flour until it resembles a coarse meal. You can use your hands to rub the butter into the dry ingredients. I just think it's a lot easier to use a mixer.
3. Add vanilla and continue to beat the batter to mix.


4. The dough will look and feel crumbly, but don't worry it will come together. Shape the dough into a ball and flatten it. Roll the dough to about 1/4 inch thick and cut with your favorite cookie cutter.


5. Chill the cut cookies in the refrigerator for 20 minutes. This will help retain it's shape when it is baked in the oven.


 6. Bake them in a preheated oven for 15 minutes, then turn the baking sheet around and continue baking for another 10 minutes, or until the shortbread is golden brown. One way to tell that your shortbread is done is by looking at the edges of the cookie. It will be slightly brown and crisp. Remove from oven and let cool completely before icing. If you decide not to ice the shortbread, simply dust some granulated sugar on top of the cookie when they come out of the oven. Let cool and serve. They are equally delicious at this stage.

Recipe for shortbread:
It is best if you weigh the recipe, but if you don't have a weighing scale, I've converted the measurement to 'cups'. This recipe yields about 40 cookies, depending on the size.
337.5g or 2 2/3 cups of plain flour 
112.5g or 2/3 + 1/4 cup granulated sugar
225g or 2 sticks of butter at room temperature
1 tbsp of vanilla
granulated sugar for dusting

If you decide to ice the cookies, here's how I did it. But first, a low down on a couple types of icing.

Piping icing:
The consistency for piping icing is similar to toothpaste. Because you are using this for outlines, you want it to flow easily, in a straight-line without breaking or cracking. You want to make sure that it is not too thin (watery) that it is hard to draw outlines on the cookie (it will drip off the sides of the cookie). 
Flood icing:
Once the outline dries, you want to "flood" the inside of the cookie with a thinner icing. Simply add water to the basic royal icing to thin it out. When you lift the beater up, it should flow back into the pool of icing slowly, like a stream. 

Recipe for Icing:
2 egg whites (you can also use pasteurized egg whites)
2 tsp lemon juice
About 3 cups of powdered sugar. You may need more if the icing is too wet.
Water, as necessary


Beat the egg whites and lemon juice together for a few seconds. Then add the powdered sugar, a tablespoon at a time until you reach the appropriate icing consistency. I started off by making the flood icing first. That way, I can divide the mixture when the flood icing is done and leave the rest to make the piping icing by adding more powdered sugar. The color of the icing is glossy and white. Add colors, if desired. I used yellow and white for the shortbread cookies.


Pipe an outline around the border of the cookie and let dry.


Once the outline dries, "flood" the inside of the cookie with thinner icing. I spread the icing, making sure I cover the entire cookie with the back of a spoon. You can also use a toothpick. Sometimes, air bubbles will form, so just use a toothpick to poke the air bubble. The 'flood' icing is made by simply adding water to 'piping icing', a teaspoon at a time. If you had accidentally added too much water, don't worry. You can thicken it by adding more powdered sugar, till you reach the right consistency.


Once the icing dries, I piped a border around the cookie again and the buds in the middle. Let dry.

Shortbread Flower cookies. 
I packaged my cookie with some edible green apple candy 'grass' that I bought from Target in a glassine bag and topped it with a ribbon.


Happy Spring!

Friday, March 23, 2012

Pork Chops, Vegetable Tian and Strawberry Tart

Throughout this past year, I have been religiously subscribing to and reading the Martha Stewart's Food Magazine on my iPad. I love the layout of that magazine on the iPad. I think the folks at MS did a great job. Each monthly subscription comes with a handful of recipes, carefully catered to the season. And with it, how-to videos of some harder to follow recipes. If you've been contemplating on whether to get that application, think no further. It is well worth the price in my opinion (not that you give a crap but I can have my own opinion).  And no, I am not endorsed by MS. But, if they would like to send some free stuff my way, I promise I will be extremely grateful.

I was browsing through my older editions of the MS magazine and stumbled upon a vinegar braised pork chop recipe. It is extremely easy to make and everything cooks in a pot, in the oven. It reminded me of a Chinese dish that also revolves primarily around pork (pork feet specifically) and sweet vinegar that my grandma makes so well. There is some similarities in flavor though the Chinese version was sweeter and the sauce, thicker. And that we put a whole bunch of other stuff in there too (ginger, eggs, etc.)


Vinegar braised pork chops
(Adapted from Martha Stewart Food Magazine)
4 1 inch thick bone in pork chops
8 cloves of garlic, smashed and peeled
1/2 cup rice vinegar
1/2 cup apple cider vinegar
1 cup water
2 tbsp sugar
Vegetable oil
Salt and pepper
  1. Preheat oven to 350 degrees F or 180 degrees C.
  2. Season the meat with salt and pepper on both sides. Sear both sides of the pork chops, about 3 minutes. Perform this in batches if all the meat does not fit into pot at one time. 
  3. Mix together vinegar, water and sugar. Add the mixture to the pork chops and throw in the garlic cloves. 
  4. Braise the pork chops, covered in the oven for about 1 hour. 
  5. Add chopped parsley and serve warm. This dish can be prepared in advance and reheated before serving. 
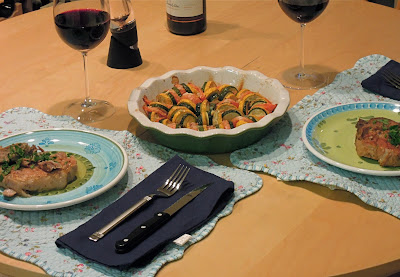
Alongside the pork chops (which was very tender, by the way), I served vegetable tian. I think we can use some vegetables with all that pork! Vegetable tian is great if some of your guests happened to be vegetarian and you are looking to make something hearty and satisfying. The dish also cooks in the oven, so you can prepare both your pork and vegetables at the same time.

Pretty much all that you need- zucchini, tomatoes, thyme, onion and yellow squash.

Vegetable Tian
(Adapted from Ina Garten)
1 medium onion
2 Sprigs of thyme
2 medium zucchini
2 medium yellow squash
4 roma tomatoes (you may not need all of them, I ended up only using 2)
1/4 cup grated parmesan cheese (you can add more if you like)
Salt and pepper
Olive Oil
  1. Preheat oven to 350 degrees F or 180 degrees C.
  2. In a saute pan, heat olive oil and cook sliced onions with thyme until soft and translucent.
  3. While onions are cooking, slice the zucchini, yellow squash and tomatoes. You want to slice them in equal thickness so they cook evenly.
  4. Add the cooked onions to a baking dish and evenly place the sliced vegetables on top.
  5. Cover the arranged dish with foil and cook in the oven for 30 minutes. Be sure to also season your vegetables with salt and pepper throughout.
  6. Remove from oven and add grated parmesan cheese. Return the dish to the oven, uncovered for another 15-20 minutes until the cheese is melted and the vegetables are cooked. 
  7. Side note - if you have a larger party, just increase the amount of vegetables and cheese proportionately. It may take a couple more minutes to cook. 
Before
After

Some people will call me a cheater bug because I don't make my own pastry shell of any kind. It's a lot of work and honestly, by the time I am done with it (prepping, making and cleaning up), it would have been much more economical to buy a pre-made shell/dough from the store. And they taste great and is always consistent (if you make them consistently...). So, give yourself a break and get the pre-made ones. No one will know better.

Strawberry-Pistachio Tart
1 store bought puff pastry, thawed
1 basket fresh ripe strawberry
2 tsp ground pistachios 
1 tsp sugar
2 tsp strawberry jam + 1 tsp water
2 tbsp pistachio, chopped
  1. Preheat oven to 400 degrees F or 205 degrees C.
  2. Roll the thawed puff pastry into an 10X12 rectangle (I just eye-ball it). I cut 4 strips around the corner of the rectangle and pressed them on top of the sides of the flat pastry. See picture below for an idea of what I'm referring to. 
  3. Bake the puff pastry for about 25 minutes or until slightly golden.
  4. Meanwhile, combine the ground pistachios and sugar. You can ground whole pistachios in a coffee grinder or a food processor. Remove puff pastry from oven and sprinkle mixture onto the pastry. Return to the oven for another 10 minutes. Be sure to check on it, so that the nuts do not get burned. 
  5. Once the puff pastry cools, brush the mixed strawberry jam and water on the crust. Then, generously spread pastry cream onto tart shell. The strawberry jam layer will help keep the crust crisp after you add the pastry cream. Click on the pastry cream link for recipe.
  6. Arrange the sliced strawberries and sprinkle some chopped pistachios on top. 


Finished strawberry and pistachio tart.
Enjoy.