Home, Design, Recipes

Tuesday, March 27, 2012

Shortbread cookies

I love the taste and texture of shortbread cookies. They are crisp on the outside but buttery and crumbly on the inside. Shortbread is a classic Scottish dessert that consists mainly of the following three ingredients: sugar, butter and flour. While I was researching other shortbread recipes, I noticed that some called for rice or cornflour and shortening. This gives a different texture to the cookie - crispier or softer depending on the type of flour and amounts used. But if you know me, I like to keep things simple and classic, which is why my shortbread recipe is made with those top three ingredients and vanilla, of course.

The shortbread recipe is adapted from Claire Clark, the former pastry chef at Thomas Keller's famous French Laundry. When we visited The French Laundry a couple years ago, we got a bag of shortbread cookies as favors after the meal. Those were the best shortbread cookies I have ever had and when I found her pastry cookbook, I was ecstatic. Obviously, the shortbread cookies were the first thing I made from that book. Claire's recipe was actually from her mother. I personally love recipes that are passed down from generation to generation. It brings a sense of nostalgia and tradition to the people making and those enjoying them. In her book and at the French Laundry, she cut her shortbread into oblong shapes, which looks more traditional. Because I wanted to make shaped cookies from the shortbread, I altered some steps in her recipe.


1. Preheat oven to 350 degrees F or 180 degrees C.
2. Cream the butter, sugar and flour until it resembles a coarse meal. You can use your hands to rub the butter into the dry ingredients. I just think it's a lot easier to use a mixer.
3. Add vanilla and continue to beat the batter to mix.


4. The dough will look and feel crumbly, but don't worry it will come together. Shape the dough into a ball and flatten it. Roll the dough to about 1/4 inch thick and cut with your favorite cookie cutter.


5. Chill the cut cookies in the refrigerator for 20 minutes. This will help retain it's shape when it is baked in the oven.


 6. Bake them in a preheated oven for 15 minutes, then turn the baking sheet around and continue baking for another 10 minutes, or until the shortbread is golden brown. One way to tell that your shortbread is done is by looking at the edges of the cookie. It will be slightly brown and crisp. Remove from oven and let cool completely before icing. If you decide not to ice the shortbread, simply dust some granulated sugar on top of the cookie when they come out of the oven. Let cool and serve. They are equally delicious at this stage.

Recipe for shortbread:
It is best if you weigh the recipe, but if you don't have a weighing scale, I've converted the measurement to 'cups'. This recipe yields about 40 cookies, depending on the size.
337.5g or 2 2/3 cups of plain flour 
112.5g or 2/3 + 1/4 cup granulated sugar
225g or 2 sticks of butter at room temperature
1 tbsp of vanilla
granulated sugar for dusting

If you decide to ice the cookies, here's how I did it. But first, a low down on a couple types of icing.

Piping icing:
The consistency for piping icing is similar to toothpaste. Because you are using this for outlines, you want it to flow easily, in a straight-line without breaking or cracking. You want to make sure that it is not too thin (watery) that it is hard to draw outlines on the cookie (it will drip off the sides of the cookie). 
Flood icing:
Once the outline dries, you want to "flood" the inside of the cookie with a thinner icing. Simply add water to the basic royal icing to thin it out. When you lift the beater up, it should flow back into the pool of icing slowly, like a stream. 

Recipe for Icing:
2 egg whites (you can also use pasteurized egg whites)
2 tsp lemon juice
About 3 cups of powdered sugar. You may need more if the icing is too wet.
Water, as necessary


Beat the egg whites and lemon juice together for a few seconds. Then add the powdered sugar, a tablespoon at a time until you reach the appropriate icing consistency. I started off by making the flood icing first. That way, I can divide the mixture when the flood icing is done and leave the rest to make the piping icing by adding more powdered sugar. The color of the icing is glossy and white. Add colors, if desired. I used yellow and white for the shortbread cookies.


Pipe an outline around the border of the cookie and let dry.


Once the outline dries, "flood" the inside of the cookie with thinner icing. I spread the icing, making sure I cover the entire cookie with the back of a spoon. You can also use a toothpick. Sometimes, air bubbles will form, so just use a toothpick to poke the air bubble. The 'flood' icing is made by simply adding water to 'piping icing', a teaspoon at a time. If you had accidentally added too much water, don't worry. You can thicken it by adding more powdered sugar, till you reach the right consistency.


Once the icing dries, I piped a border around the cookie again and the buds in the middle. Let dry.

Shortbread Flower cookies. 
I packaged my cookie with some edible green apple candy 'grass' that I bought from Target in a glassine bag and topped it with a ribbon.


Happy Spring!

Friday, March 23, 2012

Pork Chops, Vegetable Tian and Strawberry Tart

Throughout this past year, I have been religiously subscribing to and reading the Martha Stewart's Food Magazine on my iPad. I love the layout of that magazine on the iPad. I think the folks at MS did a great job. Each monthly subscription comes with a handful of recipes, carefully catered to the season. And with it, how-to videos of some harder to follow recipes. If you've been contemplating on whether to get that application, think no further. It is well worth the price in my opinion (not that you give a crap but I can have my own opinion).  And no, I am not endorsed by MS. But, if they would like to send some free stuff my way, I promise I will be extremely grateful.

I was browsing through my older editions of the MS magazine and stumbled upon a vinegar braised pork chop recipe. It is extremely easy to make and everything cooks in a pot, in the oven. It reminded me of a Chinese dish that also revolves primarily around pork (pork feet specifically) and sweet vinegar that my grandma makes so well. There is some similarities in flavor though the Chinese version was sweeter and the sauce, thicker. And that we put a whole bunch of other stuff in there too (ginger, eggs, etc.)


Vinegar braised pork chops
(Adapted from Martha Stewart Food Magazine)
4 1 inch thick bone in pork chops
8 cloves of garlic, smashed and peeled
1/2 cup rice vinegar
1/2 cup apple cider vinegar
1 cup water
2 tbsp sugar
Vegetable oil
Salt and pepper
  1. Preheat oven to 350 degrees F or 180 degrees C.
  2. Season the meat with salt and pepper on both sides. Sear both sides of the pork chops, about 3 minutes. Perform this in batches if all the meat does not fit into pot at one time. 
  3. Mix together vinegar, water and sugar. Add the mixture to the pork chops and throw in the garlic cloves. 
  4. Braise the pork chops, covered in the oven for about 1 hour. 
  5. Add chopped parsley and serve warm. This dish can be prepared in advance and reheated before serving. 
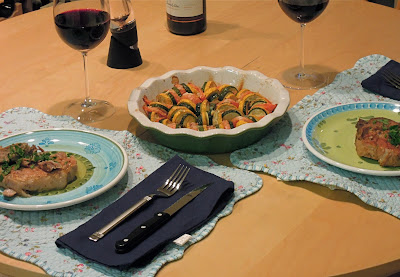
Alongside the pork chops (which was very tender, by the way), I served vegetable tian. I think we can use some vegetables with all that pork! Vegetable tian is great if some of your guests happened to be vegetarian and you are looking to make something hearty and satisfying. The dish also cooks in the oven, so you can prepare both your pork and vegetables at the same time.

Pretty much all that you need- zucchini, tomatoes, thyme, onion and yellow squash.

Vegetable Tian
(Adapted from Ina Garten)
1 medium onion
2 Sprigs of thyme
2 medium zucchini
2 medium yellow squash
4 roma tomatoes (you may not need all of them, I ended up only using 2)
1/4 cup grated parmesan cheese (you can add more if you like)
Salt and pepper
Olive Oil
  1. Preheat oven to 350 degrees F or 180 degrees C.
  2. In a saute pan, heat olive oil and cook sliced onions with thyme until soft and translucent.
  3. While onions are cooking, slice the zucchini, yellow squash and tomatoes. You want to slice them in equal thickness so they cook evenly.
  4. Add the cooked onions to a baking dish and evenly place the sliced vegetables on top.
  5. Cover the arranged dish with foil and cook in the oven for 30 minutes. Be sure to also season your vegetables with salt and pepper throughout.
  6. Remove from oven and add grated parmesan cheese. Return the dish to the oven, uncovered for another 15-20 minutes until the cheese is melted and the vegetables are cooked. 
  7. Side note - if you have a larger party, just increase the amount of vegetables and cheese proportionately. It may take a couple more minutes to cook. 
Before
After

Some people will call me a cheater bug because I don't make my own pastry shell of any kind. It's a lot of work and honestly, by the time I am done with it (prepping, making and cleaning up), it would have been much more economical to buy a pre-made shell/dough from the store. And they taste great and is always consistent (if you make them consistently...). So, give yourself a break and get the pre-made ones. No one will know better.

Strawberry-Pistachio Tart
1 store bought puff pastry, thawed
1 basket fresh ripe strawberry
2 tsp ground pistachios 
1 tsp sugar
2 tsp strawberry jam + 1 tsp water
2 tbsp pistachio, chopped
  1. Preheat oven to 400 degrees F or 205 degrees C.
  2. Roll the thawed puff pastry into an 10X12 rectangle (I just eye-ball it). I cut 4 strips around the corner of the rectangle and pressed them on top of the sides of the flat pastry. See picture below for an idea of what I'm referring to. 
  3. Bake the puff pastry for about 25 minutes or until slightly golden.
  4. Meanwhile, combine the ground pistachios and sugar. You can ground whole pistachios in a coffee grinder or a food processor. Remove puff pastry from oven and sprinkle mixture onto the pastry. Return to the oven for another 10 minutes. Be sure to check on it, so that the nuts do not get burned. 
  5. Once the puff pastry cools, brush the mixed strawberry jam and water on the crust. Then, generously spread pastry cream onto tart shell. The strawberry jam layer will help keep the crust crisp after you add the pastry cream. Click on the pastry cream link for recipe.
  6. Arrange the sliced strawberries and sprinkle some chopped pistachios on top. 


Finished strawberry and pistachio tart.
Enjoy.


Pastry Cream Recipe

Recipe for standard pastry cream

Makes 1 cup
1 cup whole milk
3 egg yolks
1/3 cup sugar
1 and 1/2 tbsp corn starch
1 tsp vanilla
1tsp Grand Marnier (or any other orange flavored liquor)
Heavy cream, if necessary

Step 1: Whisk the egg yolks and sugar until the mixture turns pale yellow and is extremely thick, about 3 minutes. Then, add the corn starch and continue whisking until fully incorporated. The mixture should fall slowly, back into the mixing bowl.

Step 2: While whisking the eggs, heat the milk in a sauce pan over medium-low heat. Do not let the milk boil.

Step 3: Carefully pour the warmed milk into the egg mixture. Be careful not to pour the milk too quickly or you will end up with pieces of scrambled eggs in your mixture.

Step 4: Once all the milk has been combined, pour the mixture back into the sauce pan.

Step 5: Over medium-low heat slowly whisk the mixture until it comes together and becomes thick, about 7 minutes. Make sure you continue to whisk throughout this process.

Step 6: Once the mixture comes together, pass it through a fine sieve. Then add the flavorings - vanilla and grand marnier. If you feel that your pastry cream is too thick, thin it out with some heavy cream, one teaspoon at a time.

Step 7: Refrigerate the pastry cream until you are ready to use. Place a piece of plastic wrap directly on top of the pastry cream to avoid having a layer (skin) from forming on top.

Monday, March 19, 2012

Naomi's birthday, a full on Japanese meal.

There is no doubt my mother-in-law is a great cook. She never fails to whip up anything less than amazing every time we have dinner at her place. If I can describe her style of cooking and her food, it will be fresh, clean and light. It is also visually appealing, with tons of colors and textures. You know how you get that feeling as though a truck has just ran you over after you over indulge? I don't feel that way with her food even though I consciously know I ate a lot. Hmm, I wonder if that is still a bad thing? :P 

She prepares her meal with tons of vegetables and they are always delicious. I have tried making the same dishes and they never quite tasted the same. Now that I'm married to a Japanese man, I feel that it is important to find a balance and continue the ways and tradition of two different cultures and hopefully pass them on to my kids (if I have them). As you continue reading and admiring the food, you will notice I have much to learn. 

We decided to have dinner at home with the family to celebrate Naomi's 2X birthday. It's been a while since we had dinner together at home. We usually celebrate birthdays at a restaurant, but wanted to do something more intimate this time.

A snapshot of our spread for the evening. 

A salad with shishito peppers and dried baby anchovies. This one packs quite a punch.

I love DIY sushi. My MIL will prepare sushi rice and we get to choose the types of fish we want to wrap with seaweed. It is not only tasty, but a lot of fun too.

Eggplant salad with picked vegetables.

 Spinach salad with sesame.

 Kinpira- made with carrots and burdock root.

 Salad with a mixture of celery, cucumber, red onion, red bell pepper and chicken.

 Since it also happened to be St. Patty's Day, she made a Japanese spinoff of corned beef and cabbage. Hers is minced pork wrapped in cabbage and stewed in sake, dashi and soy sauce. This is one of my favorites for the night.

Steamed dumplings.

My contribution for the evening is a chocolate cake with hazelnut swiss meringue buttercream per the birthday girl's request. Since I can't cook like my MIL, the least I can do is try to bake a cake. 


Happy birthday Naomi-chan and thanks mama, for cooking such a delicious meal!

Monday, March 12, 2012

Rainbow cupcakes

In anticipation of this upcoming weekend, I decided to make St. Patty's Day cupcakes for this post. Hopefully, it will inspire you to make some for this Saturday. I was searching online for cute cupcake ideas and I came across this one from Sweet Simple Stuff. It is relatively simple to make, although a little time consuming. However, the results are so worth it. My friends thought I was a baking genius! I am in no way a creative nut. Afterall, I was an accountant. The closest thing we will ever get to being creative is to include some "judgmentally non-material" balance into XXX account. (Disclaimer: This is not a confession nor am I saying that this is something all accountants do. Of course not, right?)

I chose to make the Devil's Food Cupcake from the Magnolia Bakery cookbook and tested the cupcakes on my always faithful and encouraging friends. Honestly, I did not really enjoy this recipe. I felt that the batter was too dense and it dried up quickly. If you are looking for a solid chocolate cupcake recipe, I highly recommend Ina Garten's chocolate ganache cupcakes recipe. It is very easy to make and the cake is moist and delicious. I have made this recipe several times and it is always a hit. You can also make this from a cake mix (I think Duncan Hines's cake mix is pretty good). For the frosting, I made a simple vanilla buttercream that I tinted with some food coloring.


You will need: mini marshmallows, popsicle sticks, edible gold dust, Xtremes rainbow Air Heads and melted chocolate. I got the short popsicle sticks from Michaels and the length is perfect for standard size cupcakes. I dipped the marshmallows into melted chocolate, topped it with edible gold dust and adhere it to opposite ends of the rainbow candy. I left it to dry overnight. I frosted the cupcake with green buttercream and inserted both ends of the prepared rainbow to the cupcake. I used a small "star"piping tip and piped "bushes" around the cupcake. Unfortunately, I didn't take step by step pictures. If you need clearer instructions, click here.

 Happy St. Patty's Day!

This coming Saturday also happens to be the day we are celebrating a dear friend's baby shower. Unfortunately, I am not able to attend since it is taking place in Malaysia. However, I promise to be there in spirit. Using the same ingredients I got for the St. Patty's cupcakes, I decided to do something that is more baby shower-worthy. 

Baby Oh's Rainbow cupcakes.

I tinted the buttercream with blue food coloring for the sky and pipped little clouds all around it. I adhere the sticks to the rainbow candy with melted chocolate and let it cool overnight. As you can tell, I omitted the marshmallows and covered the stick from showing with white buttercream (mimicking clouds). I also added some pearl white dragees to the clouds for texture.


Happy March 17th everyone! 

Monday, March 5, 2012

One Pot Wonder

I am a big fan of one pot meals if you hadn't noticed already. If I only need to use a chopping board, knife, pot and a spatula for the recipe, I'm in. Why? Two simple words. I'm lazy... Is that three?

You don't have to do a lot of dishes in the end and clean up is easy. Plus, one pot meals are great if you need to prepare something in advance. The longer everything sits together, the tastier it gets. It's great for pot lucks and entertaining without the fuss. With most one pot meals, I can just put the ingredients directly into the pot right as I chop them. So, I always set up my prep area next to the pot. No additional plates needed.

I've made this dish a couple times for a few friends and it was a big hit. Although we don't get unbearable cold weathers here in Southern California, it gets a little chilly at night from time to time. I love making lamb stew with couscous during cold, "winter" nights like these.

 You have your fruits, vegetables, beans and meat. All in a pot!

 Yo yo yo, just chop and drop. Uh-huh...

This is what it looks like when you get everything but the kitchen sink in there.

Lamb Stew courtesy of yours truly, serves 4:
1 tbsp olive oil
1 lb of lamb stew meat
1/2 lb merguez lamb sausage *
1 medium onion
3 garlic cloves
1 can garbanzo beans, rinsed
1 28 ounce can whole peeled tomatoes
1/2 cup dried plums
1 cup dried apricots
1 tsp cinnamon
1 tsp dried oregano
1 tsp paprika
Salt and pepper to taste
1 tsp orange zest
* I got the merguez lamb sausage from Whole Foods Market. The lamb sausage is essential in this dish because it contains harissa, a type of hot chili paste. If you can't find lamb merguez sausage but is able to find harissa, use about 1 tbsp of that paste and increase the amount of lamb stew meat.

Directions: Heat olive oil and sear both lamb stew meat and merguez sausage. Add the chopped garlic and onion to the mixture to sauté. Stir in the peeled tomatoes and bring the mixture to a boil. Lower the heat to medium. Add the rinsed garbanzo beans and diced dried apricot and plums. The dried fruits will add sweetness to the dish. Stir in the cinnamon, oregano, paprika and salt and pepper. Let the mixture stew for about 30 minutes over medium to low heat. Before serving, add the orange zest. The zest brings some freshness and acidity to the hearty dish, but do this right before serving. I served my lamb stew with some couscous. You can definitely eat it with pita or some crusty bread.

I add mint, parsley and toasted pine nuts to store bought couscous. A little something something to just plain carbs. I say if you're going to eat carbs, make sure it actually tastes good. Or else you'll be sacrificing calories for nothing.

Final product. You can plate the stew next to the couscous for a simple look or just smother the couscous with lamb stew (pic above). I don't judge. :)