Home, Design, Recipes

Monday, March 19, 2012

Naomi's birthday, a full on Japanese meal.

There is no doubt my mother-in-law is a great cook. She never fails to whip up anything less than amazing every time we have dinner at her place. If I can describe her style of cooking and her food, it will be fresh, clean and light. It is also visually appealing, with tons of colors and textures. You know how you get that feeling as though a truck has just ran you over after you over indulge? I don't feel that way with her food even though I consciously know I ate a lot. Hmm, I wonder if that is still a bad thing? :P 

She prepares her meal with tons of vegetables and they are always delicious. I have tried making the same dishes and they never quite tasted the same. Now that I'm married to a Japanese man, I feel that it is important to find a balance and continue the ways and tradition of two different cultures and hopefully pass them on to my kids (if I have them). As you continue reading and admiring the food, you will notice I have much to learn. 

We decided to have dinner at home with the family to celebrate Naomi's 2X birthday. It's been a while since we had dinner together at home. We usually celebrate birthdays at a restaurant, but wanted to do something more intimate this time.

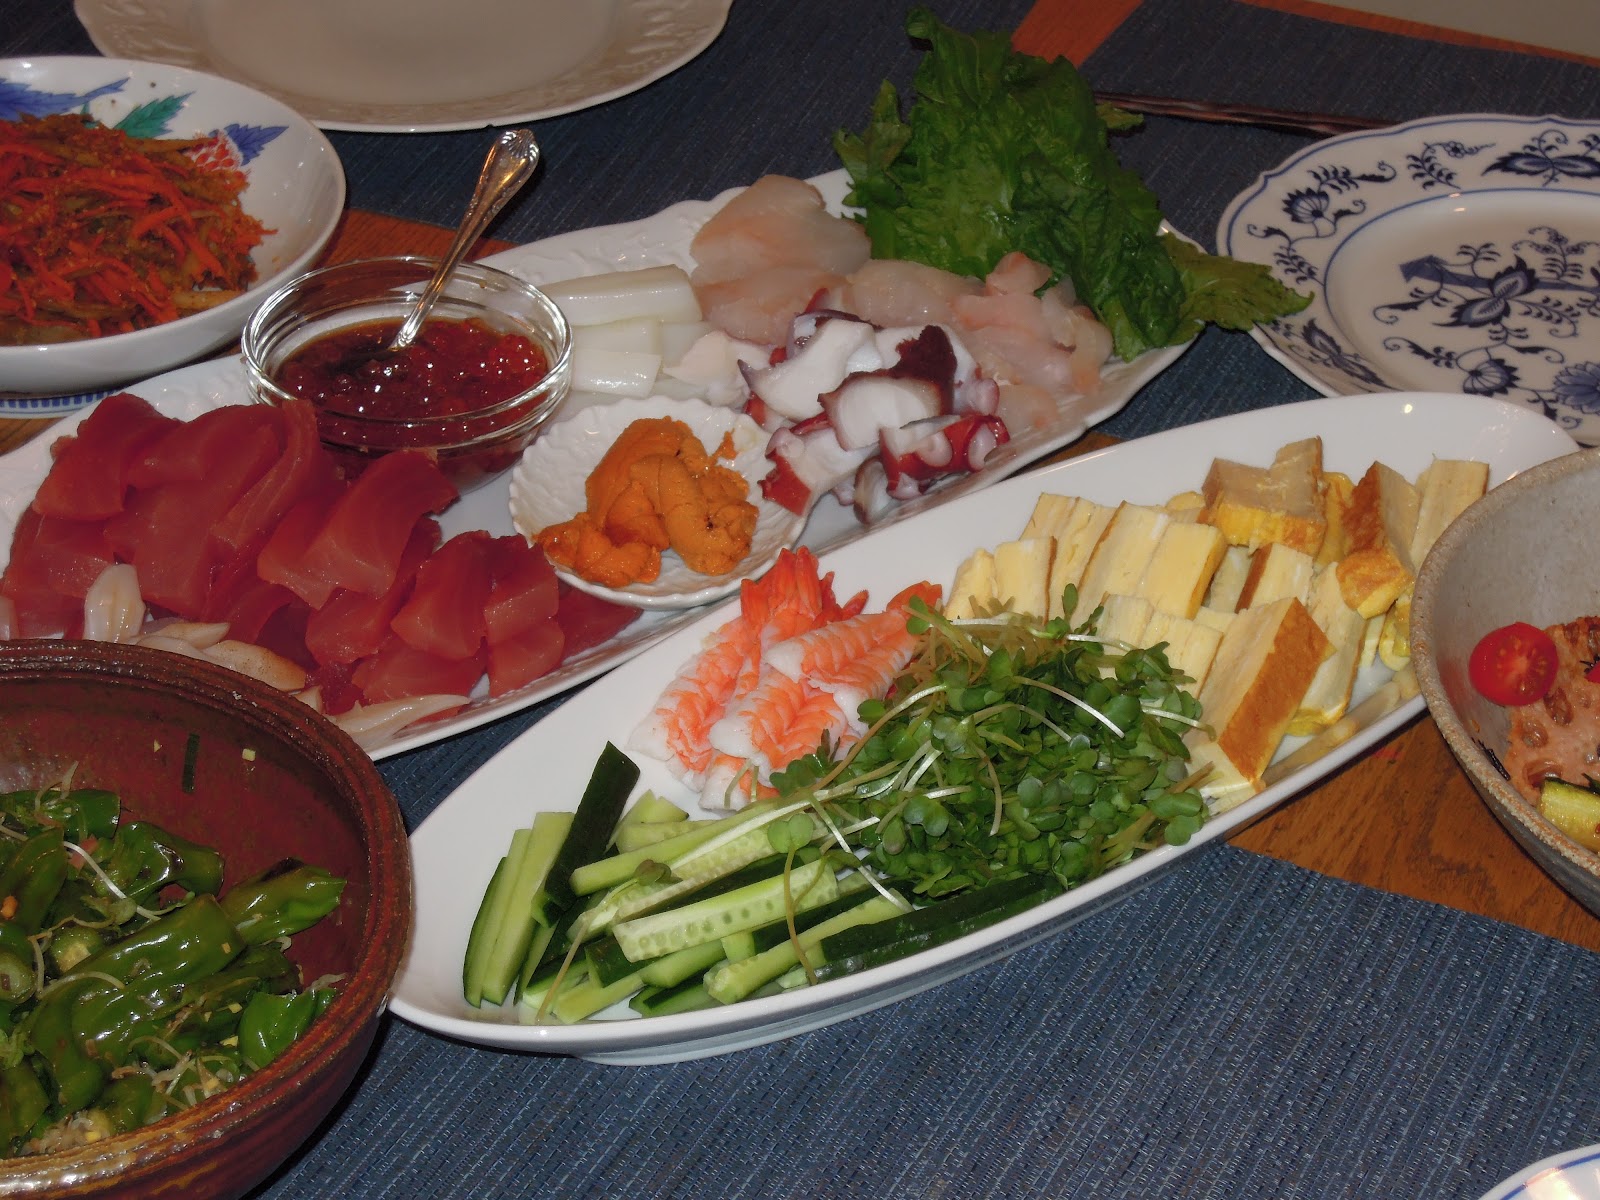
A snapshot of our spread for the evening. 

A salad with shishito peppers and dried baby anchovies. This one packs quite a punch.

I love DIY sushi. My MIL will prepare sushi rice and we get to choose the types of fish we want to wrap with seaweed. It is not only tasty, but a lot of fun too.

Eggplant salad with picked vegetables.

 Spinach salad with sesame.

 Kinpira- made with carrots and burdock root.

 Salad with a mixture of celery, cucumber, red onion, red bell pepper and chicken.

 Since it also happened to be St. Patty's Day, she made a Japanese spinoff of corned beef and cabbage. Hers is minced pork wrapped in cabbage and stewed in sake, dashi and soy sauce. This is one of my favorites for the night.

Steamed dumplings.

My contribution for the evening is a chocolate cake with hazelnut swiss meringue buttercream per the birthday girl's request. Since I can't cook like my MIL, the least I can do is try to bake a cake. 


Happy birthday Naomi-chan and thanks mama, for cooking such a delicious meal!

Monday, March 12, 2012

Rainbow cupcakes

In anticipation of this upcoming weekend, I decided to make St. Patty's Day cupcakes for this post. Hopefully, it will inspire you to make some for this Saturday. I was searching online for cute cupcake ideas and I came across this one from Sweet Simple Stuff. It is relatively simple to make, although a little time consuming. However, the results are so worth it. My friends thought I was a baking genius! I am in no way a creative nut. Afterall, I was an accountant. The closest thing we will ever get to being creative is to include some "judgmentally non-material" balance into XXX account. (Disclaimer: This is not a confession nor am I saying that this is something all accountants do. Of course not, right?)

I chose to make the Devil's Food Cupcake from the Magnolia Bakery cookbook and tested the cupcakes on my always faithful and encouraging friends. Honestly, I did not really enjoy this recipe. I felt that the batter was too dense and it dried up quickly. If you are looking for a solid chocolate cupcake recipe, I highly recommend Ina Garten's chocolate ganache cupcakes recipe. It is very easy to make and the cake is moist and delicious. I have made this recipe several times and it is always a hit. You can also make this from a cake mix (I think Duncan Hines's cake mix is pretty good). For the frosting, I made a simple vanilla buttercream that I tinted with some food coloring.


You will need: mini marshmallows, popsicle sticks, edible gold dust, Xtremes rainbow Air Heads and melted chocolate. I got the short popsicle sticks from Michaels and the length is perfect for standard size cupcakes. I dipped the marshmallows into melted chocolate, topped it with edible gold dust and adhere it to opposite ends of the rainbow candy. I left it to dry overnight. I frosted the cupcake with green buttercream and inserted both ends of the prepared rainbow to the cupcake. I used a small "star"piping tip and piped "bushes" around the cupcake. Unfortunately, I didn't take step by step pictures. If you need clearer instructions, click here.

 Happy St. Patty's Day!

This coming Saturday also happens to be the day we are celebrating a dear friend's baby shower. Unfortunately, I am not able to attend since it is taking place in Malaysia. However, I promise to be there in spirit. Using the same ingredients I got for the St. Patty's cupcakes, I decided to do something that is more baby shower-worthy. 

Baby Oh's Rainbow cupcakes.

I tinted the buttercream with blue food coloring for the sky and pipped little clouds all around it. I adhere the sticks to the rainbow candy with melted chocolate and let it cool overnight. As you can tell, I omitted the marshmallows and covered the stick from showing with white buttercream (mimicking clouds). I also added some pearl white dragees to the clouds for texture.


Happy March 17th everyone! 

Monday, March 5, 2012

One Pot Wonder

I am a big fan of one pot meals if you hadn't noticed already. If I only need to use a chopping board, knife, pot and a spatula for the recipe, I'm in. Why? Two simple words. I'm lazy... Is that three?

You don't have to do a lot of dishes in the end and clean up is easy. Plus, one pot meals are great if you need to prepare something in advance. The longer everything sits together, the tastier it gets. It's great for pot lucks and entertaining without the fuss. With most one pot meals, I can just put the ingredients directly into the pot right as I chop them. So, I always set up my prep area next to the pot. No additional plates needed.

I've made this dish a couple times for a few friends and it was a big hit. Although we don't get unbearable cold weathers here in Southern California, it gets a little chilly at night from time to time. I love making lamb stew with couscous during cold, "winter" nights like these.

 You have your fruits, vegetables, beans and meat. All in a pot!

 Yo yo yo, just chop and drop. Uh-huh...

This is what it looks like when you get everything but the kitchen sink in there.

Lamb Stew courtesy of yours truly, serves 4:
1 tbsp olive oil
1 lb of lamb stew meat
1/2 lb merguez lamb sausage *
1 medium onion
3 garlic cloves
1 can garbanzo beans, rinsed
1 28 ounce can whole peeled tomatoes
1/2 cup dried plums
1 cup dried apricots
1 tsp cinnamon
1 tsp dried oregano
1 tsp paprika
Salt and pepper to taste
1 tsp orange zest
* I got the merguez lamb sausage from Whole Foods Market. The lamb sausage is essential in this dish because it contains harissa, a type of hot chili paste. If you can't find lamb merguez sausage but is able to find harissa, use about 1 tbsp of that paste and increase the amount of lamb stew meat.

Directions: Heat olive oil and sear both lamb stew meat and merguez sausage. Add the chopped garlic and onion to the mixture to sauté. Stir in the peeled tomatoes and bring the mixture to a boil. Lower the heat to medium. Add the rinsed garbanzo beans and diced dried apricot and plums. The dried fruits will add sweetness to the dish. Stir in the cinnamon, oregano, paprika and salt and pepper. Let the mixture stew for about 30 minutes over medium to low heat. Before serving, add the orange zest. The zest brings some freshness and acidity to the hearty dish, but do this right before serving. I served my lamb stew with some couscous. You can definitely eat it with pita or some crusty bread.

I add mint, parsley and toasted pine nuts to store bought couscous. A little something something to just plain carbs. I say if you're going to eat carbs, make sure it actually tastes good. Or else you'll be sacrificing calories for nothing.

Final product. You can plate the stew next to the couscous for a simple look or just smother the couscous with lamb stew (pic above). I don't judge. :)

Monday, February 27, 2012

What's for dinner, hunny?

I get that question a lot ever since I started my housewife venture over a year ago. Dinner is almost always ready when my husband steps foot in the apartment. I feel like he's gotten it down to the last few minutes when I'm either reheating the food or plating them, just in time for him to put his briefcase down and change into something comfortable. Some would say, spoiled much? ;)

On the menu tonight: pan seared salmon over a bed of sautéed spinach and a side of cauliflower gratin. Oh, and pea soup. I love to see colors on the plate. It just makes the dish a little more fun to eat.


I always keep a bag of frozen peas in the freezer because it is such a versatile ingredient and can be used in soups, risottos or salads. This time, I decided to make pea soup with some leftover frozen pearl onions that I had from my beef bourguignon dinner a couple weeks ago. You only need a handful of ingredients in this soup - garlic, beef broth, frozen pearl onions, bacon and of course, peas!


I cooked the bacon directly in the pot - that will help render some fat without adding any more oil. Then, I added the rest of the ingredients and brought it to a boil. When all the vegetables are cooked, I pureed the soup with my handy dandy immersion blender. You can also use a food blender but if you love pureed soups like I do, I would suggest that you invest in an immersion blender. With a hand held immersion blender, you can puree the soup directly in the pot, without having to clean another kitchen equipment. In the past, I had always used a food blender. The problem with that is you have to wait till the soup cools  before you can blend it.  I got burned once because I didn't wait for it to cool down and the steam from the hot soup pushed the lid off the blender and I got hot soup all over me. It was not fun. So, personally, an immersion blender is the way to go. My husband got me the hand held Kitchen Aid immersion blender for Christmas a couple years ago. The blending attachment can be easily removed and clean. I find it very useful when making soups and sauces. Of course, you can also use it for smoothies and other stuff that you need to blend.

Before

After
I added some croutons to the soup. Croutons (cubed and toasted bread)

Moving on to the main dish - pan seared salmon with sautéed spinach. With fish, you always want to make sure that you don't overcook it or the meat will become really tough and difficult to eat. Therefore, I always cook it last so that, I don't have to reheat them in the microwave and I can serve immediately. If you have to reheat it in the microwave and the microwave smells fishy after that, simply cut a lemon in half and heat the lemon in the microwave for 10 seconds. That's a trick that I've learned and should get the fishy smell away. 

I sautéed some baby spinach with garlic and olive oil. When the spinach is almost ready, I season it with salt and pepper and added some lemon juice. I learned to cook salmon from my mom. There is no marinade necessary, simply fresh salmon, salt and pepper, lemon and good olive oil. I season the salmon with salt and pepper on both sides, and rub them with olive oil. I used a dry non-stick skillet over medium high heat. When the pan is hot, I lay the salmon skin side down. The heat from the hot pan will give you a nice sear on the skin. When I first learned to cook, I tend to move whatever meat I am making around, thinking that I will burn the meat if I don't. That's so not true. You want to let the meat sear, so it has a nice crusty brown layer on the top. The sear will also help keep the juices in the meat. I sear the salmon for about 3 minutes on each side (depending on the thickness of the salmon). When the salmon is almost ready, I squeeze in some lemon juice. I also made some gremolata to top this dish. Gremolata is, according to Wikipedia, a chopped herb condiment. It's a combination of garlic, lemon zest and parsley. Sounds fancy, but it's really just made out of these three ingredients. 

Fresh Salmon from Whole Foods Market


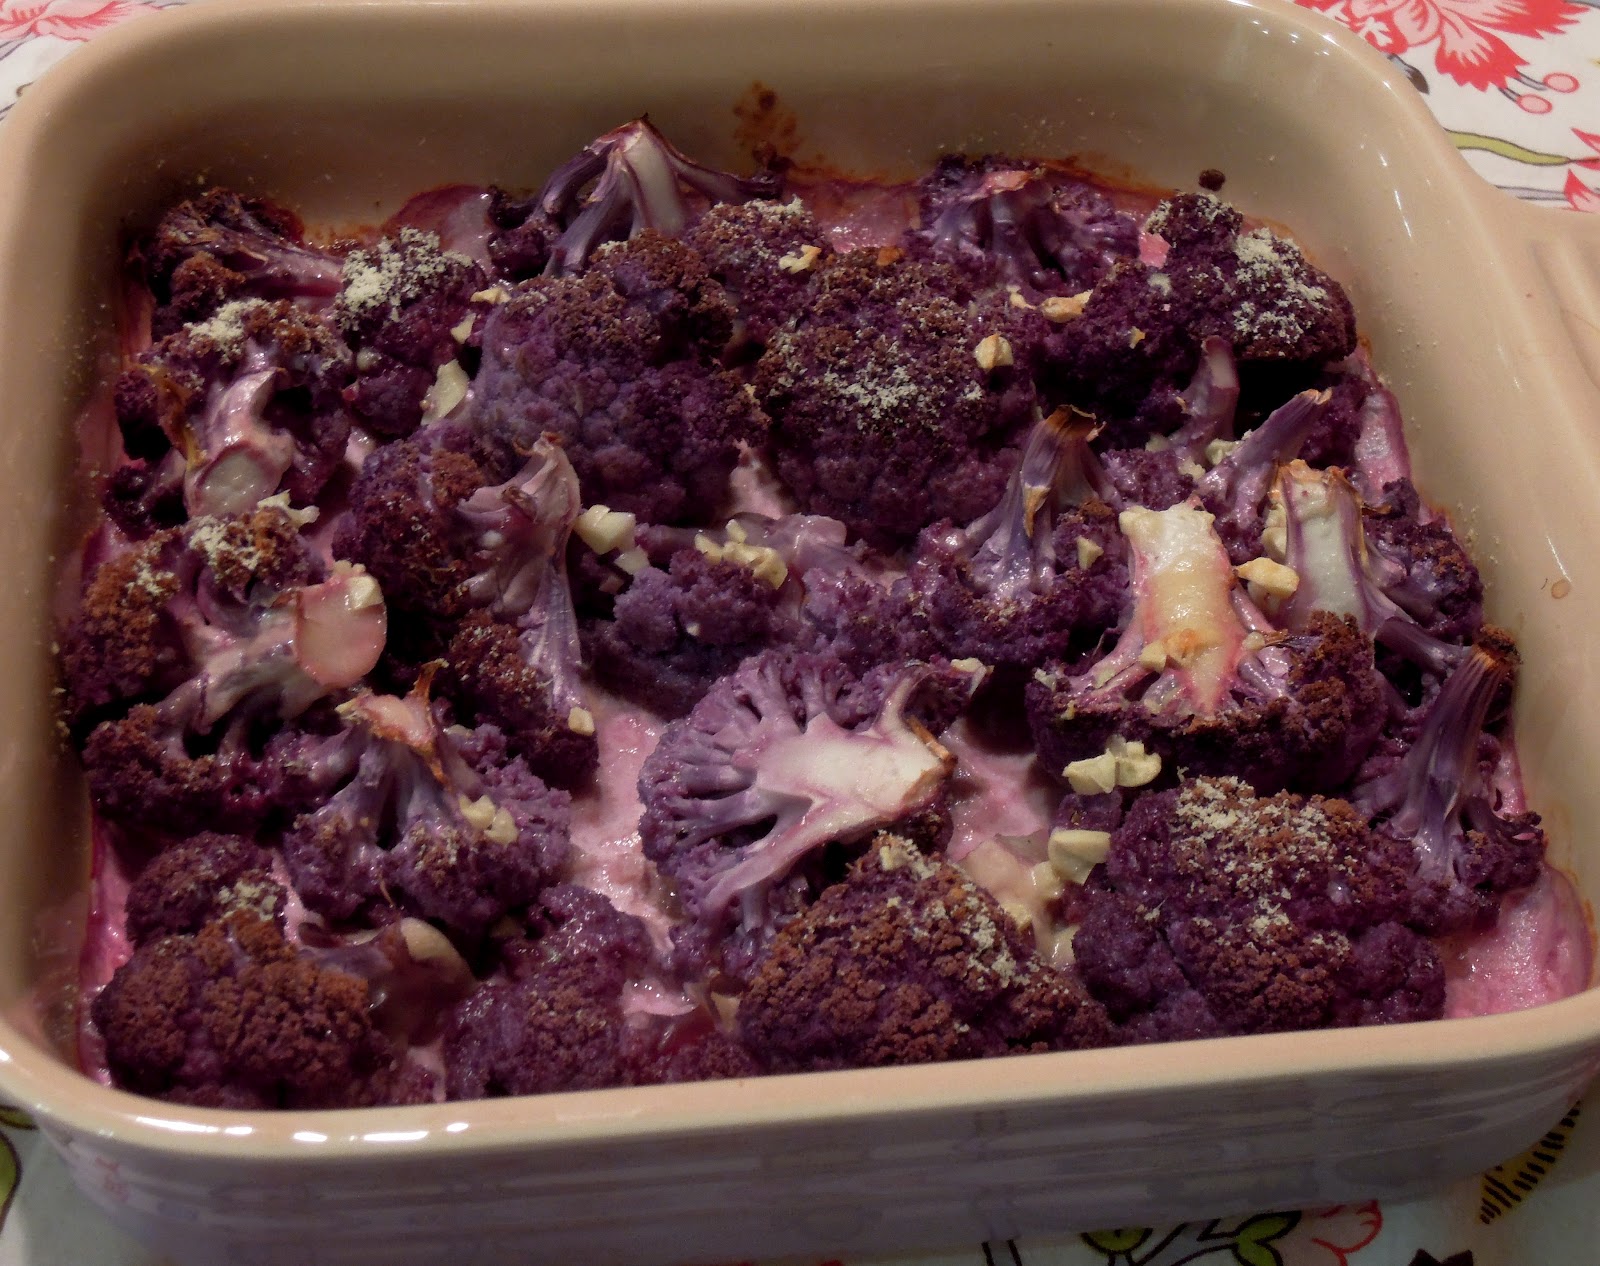
Our little side of cauliflower gratin. Typically, cauliflower gratin is made with béchamel sauce topped with several types of cheeses (gruyere, parmesan or cheddar). My version is slightly lighter and you can make it all in a baking dish. No other pots required. I also decided to use purple cauliflower instead of the typical white ones to give this dish some color. 

I add cauliflower florets (from one head of cauliflower seasoned with salt and pepper and olive oil) to a baking dish and roasted them for about 10 minutes at 380F. For my gratin "sauce", I added 2 cloves of chopped garlic to 1/2 cup buttermilk (if you don't have buttermilk, you can use heavy cream) and together, covered the roasted florets with some grated parmesan. I continued baking the dish for another 10 minutes until the florets are fully cooked through and the cheese is melted. The finished dish adds a nice purple hue to the meal. 


Enjoy...

Wednesday, February 22, 2012

Three day Meat Fest!

The last three days had been a complete and utter meat fest.

Day One:
My friends and I finally managed to snag a reservation at the infamous Animal Restaurant up in LA last Friday. Even though we only got to eat at 9:30pm, we were very excited to try after all the hype and rave reviews. We had a group of 8 people (4 couples) so we decided to order a bunch of stuff to try (a total of 21 dishes when we were finally done). A couple of notable dishes if you do try that place: - foie gras loco moco, barbecue pork belly sandwich and grilled quail. We also ordered the poutine, chicken liver toast, bone marrow, pig ear, pork ribs, polenta, veal tongue and hamachi. The only non heavy dish that night was the hamachi tostada which was refreshing and a much needed dish in our almost all meat menu. Overall, it was a very enjoyable experience. The company and food was great, although some dishes were slightly salty. We really wanted to see what the hype is all about and this place definitely lives up to its reputation.

 Foie Gras Loco Moco

BBQ Pork Sliders
Photos courtesy of yelp reviewers


Day 2:
HONEY PIG! What a great name for a Korean Barbeque restaurant. The concept is slightly different from other KBBQ places that I have tried. First off, you cook your meat on this cast iron-like wok cover and they place the kimchi and bean sprouts directly on the cast-iron. You don't get as many side dishes as you normally would at other KBBQ places but I am ok with that since I usually only eat the kimchi and rice paper. The quality of the meat is good and the meal is priced reasonably. Also, they cook your meat with chunks of butter, which makes it even tastier! When you're done with the meat, the server will prepare kimchi fried rice directly on the cast iron. The rice is really good when it gets a little crunchy and burned at the bottom. Totally adds another dimension of texture and flavor to an otherwise ordinary kimchi mixed rice.

Honey Pig cast iron wok
Photo courtesy of yelp reviewers

Day 3:
This is probably the healthiest of  all meals we had over the entire weekend. We were at Chino Hills celebrating a friend's birthday and in continuation of our carnivore weekend, we had shabu shabu for lunch. We tried to burn off some calories with bowling later. I am guessing a little bit helps, right? Here's a shoot out to Kittiya Chanporn, the birthday woman girl - Happy birthday and wishing you a year of joy and success! I'll end this post with a couple of pictures I took of two adorable sisters who reminded me of how awesome and pure sisterly love is.


Side note:
I am still recovering from my meat coma and have been doing some online research for a cleanse diet. Is there something out there that is somewhat doable? I don't want to be drinking lemon juice and cayenne pepper the entire time.

Wednesday, February 15, 2012

Happy Valentine's Day

It was a little chilly on Valentine's day and I thought of making something that would warm our stomachs for dinner. I finally decided on filet of beef bourguignon from my favorite food network star, Ina Garten. I got this recipe from her very first cookbook, simply "The Barefoot Contessa Cookbook". This recipe is her interpretation of Julia Child's famous beef bourguignon minus the extra stewing time. I followed Ina's recipe closely and it was very easy to make. The only thing that I omitted from the recipe is butter. I think my husband and I can do without the extra fat and calories. I guess without the butter, it isn't really an Ina Garten dish. Maybe this can be in MY cookbook in the future? :P

The sauce was incredibly smooth and velvety even without the butter. I prepared this dish during the day and re-heated it right before dinner. We enjoyed the beef bourguignon with some crusty french loaf that I toasted and rubbed generously with garlic. That added another depth of flavor when we dipped it into the rich sauce. Although this dish really is a one pot wonder, it is distinctly elegant and absolutely delicious. This is definitely a crowd pleaser that can be prepared well ahead of time.


I made a simple side salad to accompany the beef bourguignon. Since strawberries are in season, I added them to a simple tossed salad. Not only does it add color to the dish, the balsamic vinegar pairs well and adds sweetness to the strawberries. It was almost like a palette cleanser to the richer beef bourguignon.


The night before, I made some red velvet batter that I baked in heart-shaped baking molds (following the Valentine's Day theme). I got the red velvet recipe from my recently purchased Magnolia Bakery cookbook. Magnolia Bakery tops their red velvet cakes with a creamy vanilla frosting. However, I decided to use cream cheese because personally, I love red velvet cakes best with cream cheese frosting.  


I piped a simple rose design on the cake, making sure I topped it generously with cream cheese frosting. I added a simple heart shaped macaron cookie on the side to finish the cake.


Finally, it was time to eat! Overall, it was a relatively simple meal to make and the results are amazing. I hope you will try this if you decide to make something special without a whole lot of fuss.

Happy Valentine's Day!


Recipe for vanilla cream cheese frosting, courtesy of yours truly:

2 8ounce cream cheese packages, room temperature
1/2 stick unsalted butter, room temperature
1 tbsp vanilla
4 cups powdered sugar

Beat the cream cheese, unsalted butter and vanilla with a paddle attachment for 1 minute. Do not whip. Slowly add powdered sugar to the creamed mixture a cup at a time beating until smooth. If the batter is too thick, add some milk. If the batter is too thin, simply add more powdered sugar.

Sunday, February 12, 2012

Papa's 38th birthday!

I heart Valentine's Day! Please don't barf. Not only is this the most romantic day of the year (all right, I'm just kidding) but it is also strawberry season! I am more excited about the latter, obviously...no, seriously! Now, what has this gotta do with my father-in-law's birthday? Read on.

I made this cake for a dear friend's birthday a couple years ago and it was a big hit. So, I wanted to make this again for my father-in-law's 38th birthday (he always turns 38 on his birthday). I named this the J-Wang cake, after my good friend just because she was the first guinea pig in this recipe. So, I decided to name it in her honor. :)


This is a flourless chocolate cake with a strawberry mousse filling. Because the cake itself is so light, I didn't frost the cake with a heavy-type frosting. Instead, I opted for chantilly whipped cream. This cake calls for sugar, eggs, butter, chocolate (I used Valrhona chocolate), strawberries and whipping cream.


The whipped egg whites is what makes this cake super light and fluffy, almost soufflé-like. There is no flour in this recipe, so it's also gluten free.


I got these fresh and beautiful strawberries from an organic farm stand across the street. They are juicy and sweet, just perfect for this recipe. I love using in season ingredients because you are enjoying them at their very best.


I covered the filling of the cake generously with bite size pieces of strawberries and strawberry mousse (made from pureed strawberries and whipped cream). I personally like to cut and arrange the strawberries in a single layer because that way, you get a piece of strawberry with every single bite.


A simple piping around the cake. I hope to get better as I continue to practice piping.


Now, one with the birthday boy man. This is him with his 'Steve Jobs' impression. His name is really Sam (close) but if he can be 38 every year, he can be called Steve for one day out of the year. Happy birthday to the best FIL!